Japan Stigmatized Property 3 Sugiya Ryokan (杉谷 / 杉屋旅館)
A cluttered ryokan where memory mistakes end shifts faster than jump scares.
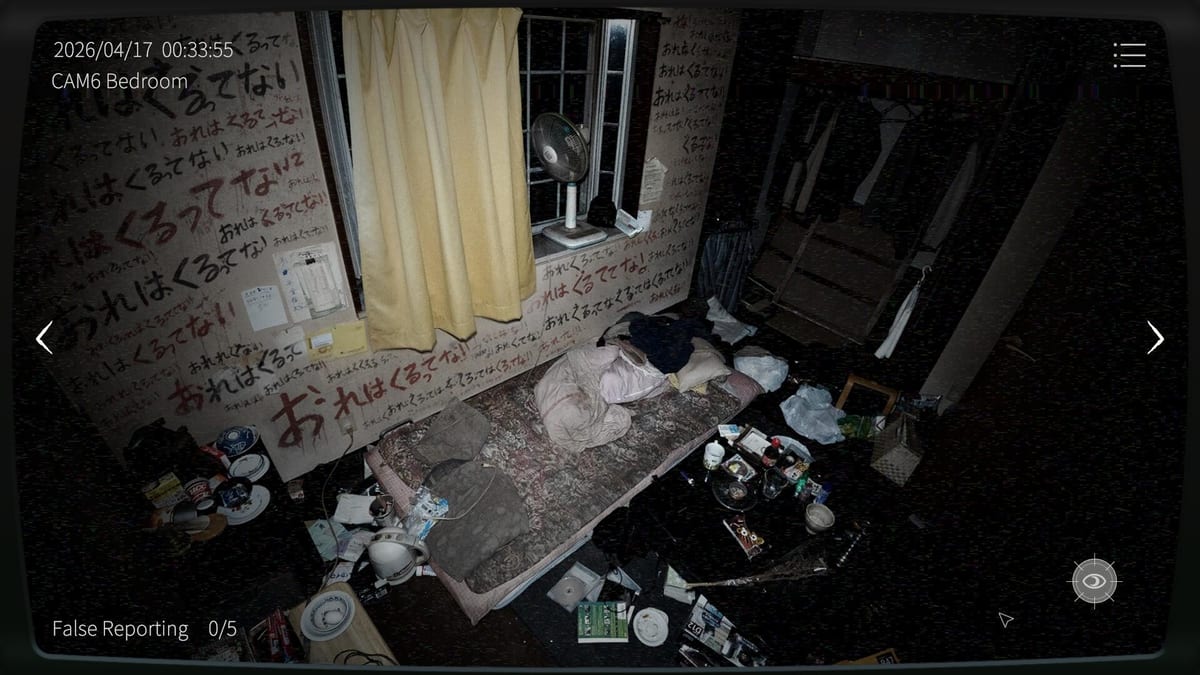
Case overview
Sugiya Ryokan is the Japan Stigmatized Property 3 assignment that tests baseline memory hardest. The site is a cluttered traditional inn—often labeled 杉谷 or 杉屋旅館 depending on local naming—packed with rooms, corridors, and object-dense frames. Furniture, bedding, shelves, and decorative noise fill many cameras. That density is the real antagonist. Anomalies that would be obvious in a sparse room hide inside ordinary mess.
Your job is unchanged from every other JSP3 property: monitor from 00:00 to 05:00, report irregularities, and avoid stacking false reports. Controls stay A/D for camera cycling, W for night vision, and hold-click to file a report. What changes is how carefully you must lock a mental photograph of each feed before the first anomaly lands.
Why clutter is the pain point
New officers fail Sugiya because they report “something looks weird” without knowing the midnight baseline. A pillow angle, a door gap, a hanging cloth, or a shelf shadow can look suspicious simply because the room was already busy. False reports burn your allowance. On Hazard Pay (特別手当) that allowance is stricter, so the same guesswork ends the night earlier.
Build the baseline deliberately. At 00:00, walk every camera once in normal view and once in night vision. Name what matters out loud if it helps: bed position, table objects, hallway shoes, light state. You are not memorizing an encyclopedia; you are memorizing this night’s starting set dressing so later changes stand out.
Camera rotation method
Pick a fixed A/D order and keep it for the whole shift. Skipping a “boring” corridor is how quiet anomalies age into fail states. Spend slightly longer on the densest indoor feeds, but do not park forever on one camera while others go stale. A healthy rhythm is a full rotation often enough that no feed feels forgotten.
When a frame feels wrong, do not report immediately. Toggle W. Compare both modes. Some changes pop only under night vision; some are clearer in the standard feed. Hold-click only after the comparison. If you still are not sure, finish the rest of the rotation and return. Certainty beats panic clicks.
Normal versus Hazard Pay
On Normal, use Sugiya as a training ground for patience. Accept slower clears while your baseline skill improves. On Hazard Pay, expect denser pressure and less room for false alarms. Do not invent exact spawn counts—treat Hazard Pay as the same property with less forgiveness. If your Normal clears still include several unsure reports, stay on Normal until those guesses disappear.
Hazard Pay achievements and special allowance clears exist for officers who can keep the same method under stress. The method does not change: baseline, rotate, dual-mode check, report only confirmed deltas.
Co-op notes for the ryokan
Two-player co-op helps when you split wings instead of both staring at the lobby. Create a room with ID and password—there is no Steam invite or random matchmaking—and agree who owns which camera numbers. PC and mobile can share the same room; see Cross-play and How to Co-op. Thermal vision unlocks in co-op and can highlight heat that clutter hides; use it after night vision, not instead of a baseline. Details live on Thermal Camera.
Voice or text callouts matter more here than on open maps. Say camera names and what changed (“Cam 3 shelf empty”) so your partner does not double-report or ignore a real miss.
Related properties and next steps
After you can clear Sugiya without guessing, move to Blue House for cleaner rooms and lighting-focused tricks, then Kannonzaki Park for outdoor distance, then Y Residence for cult-linked interiors. Return to the Properties Hub whenever you need the full case index.
Shift checklist unique to Sugiya
- Memorize dense rooms before the first scare, not after.
- Expect false-report temptation from ordinary clutter.
- Prefer a second look with night vision over a fast report.
- In co-op, split floors or camera blocks so nobody orphan-watches a wing.
- On Hazard Pay, treat every uncertain click as a potential run-ender.
Sugiya Ryokan rewards officers who respect memory work. Master the clutter, and the rest of Japan Stigmatized Property 3 feels more readable.
When a Sugiya shift ends in failure, write down the camera you rushed and whether the miss was a mode swap you skipped. That single note usually improves the next night more than grinding another blind attempt.
Frequently Asked Questions
Quick answers for Japan Stigmatized Property 3 shifts.
What is Sugiya Ryokan in JSP3?
It is the cluttered ryokan case file (杉谷 / 杉屋旅館). Dense object layouts make baseline memory the main skill, not raw reaction speed.
Why do I false-report so often here?
Busy rooms look anomalous even when nothing changed. Lock the 00:00 baseline, then confirm with night vision before hold-click reporting.
Is Hazard Pay different on Sugiya?
Hazard Pay uses the same property with higher pressure and tighter false-report limits. Learn Normal clears first, then push special allowance runs.
Does co-op help at the ryokan?
Yes. Split camera ownership, use room ID plus password, and unlock thermal scans in pair shifts to catch heat that clutter can hide.